Figuring out how to tighten toilet seat with no access underside requires a specific approach using top-fixing blind hole fittings. This six-step process takes 15-20 minutes and requires only basic hand tools. The single factor that determines your success is keeping the mounting holes completely bone dry before inserting the new anchors.
Before You Start
Understanding your hardware is the first requirement before removing any existing pieces. Top-fixing toilets feature a skirted or fully enclosed porcelain bowl, meaning you cannot reach your hand underneath to thread a traditional plastic nut onto a bolt. You must use a blind-hole expansion kit.
- Total Time Required: 15-20 minutes.
- Difficulty: Beginner.
- Typical Cost: $12 to $25 for replacement hardware.
- Prerequisites: You must confirm your toilet bowl actually has blind holes. Run your hand down the exterior side of the bowl directly below the hinges. If the porcelain is smooth and extends straight to the floor with no recesses or access panels, you have a fully skirted toilet.
| Item | Exact Quantity | Typical Cost | Purpose / Settings |
| Top-Fixing Hinge Kit (Rubber Well-Nuts) | 1 kit | $15.00 | Contains 2 rubber anchors, 2 M5/M6 bolts, washers, and brackets. |
| Phillips Head Screwdriver | 1 | $0.00 | Manual tightening only. No power tools allowed. |
| Flathead Screwdriver | 1 | $0.00 | Prying open plastic hinge caps. |
| Dish Soap (Optional) | 1 drop | $0.00 | Mild lubrication if anchors refuse to enter the hole. |
| Isopropyl Alcohol (70%+) | 1 bottle | $3.00 | Dissolving urine scale and degreasing the porcelain. |
| Microfiber Cloth | 1 | $0.00 | Drying the mounting area completely. |
| Needle-Nose Pliers | 1 | $0.00 | Gripping and extracting stubborn old hardware. |
Process Overview
| Step | Action | Time | Most Common Mistake |
| 1 | Remove Covers and Assess | 2 mins | Snapping the plastic retention clips on the hinge caps. |
| 2 | Extract Old Hardware | 5 mins | Dropping the old bolt into the hollow porcelain body. |
| 3 | Clean Mounting Area | 2 mins | Leaving the inside of the hole damp. |
| 4 | Insert New Anchors | 2 mins | Using too much soap, causing the anchor to spin later. |
| 5 | Align the Seat | 3 mins | Tightening fully before checking the front rim overhang. |
| 6 | Final Tightening | 3 mins | Using a power drill and cracking the vitreous china. |
Step 1: Remove Hinge Covers and Assess the Hardware
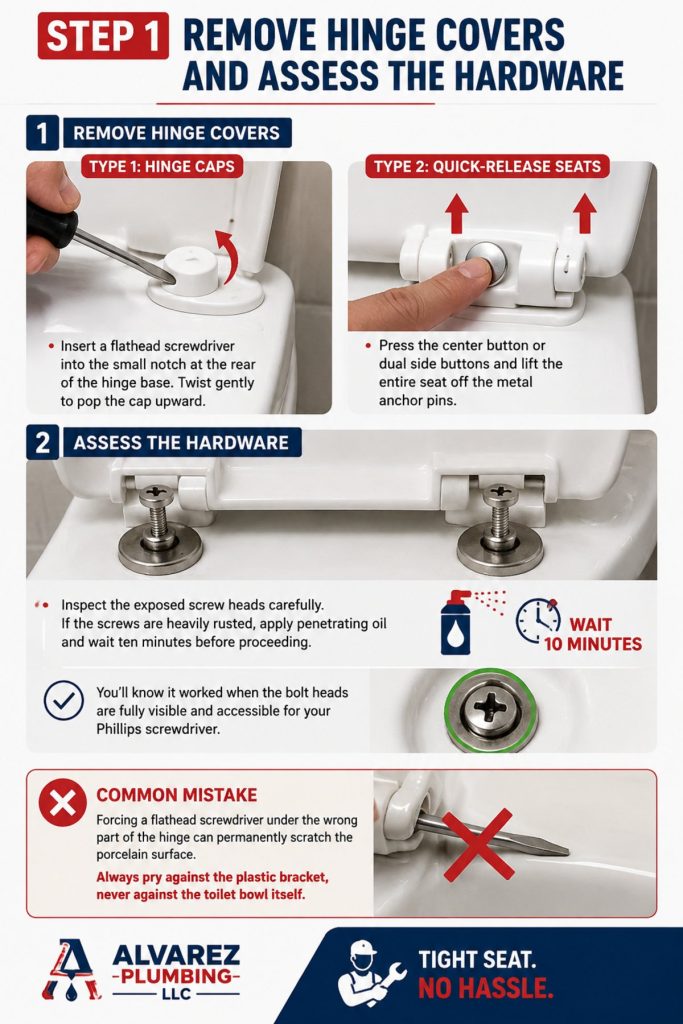
Pry the decorative plastic or metal caps off the rear hinges using a flathead screwdriver to expose the mounting bolts. Insert the flathead tip into the small notch typically located at the rear of the hinge base. Twist the handle gently to pop the cap upward. Some modern seats use a quick-release mechanism instead of caps. For these, press the center button or dual side buttons and lift the entire seat off the metal anchor pins.
Inspect the exposed screw heads carefully. If the screws are heavily rusted, you will need to apply penetrating oil and wait ten minutes before proceeding. Plumbers frequently encounter seized bolts in this exact location due to condensation and cleaning chemicals.
You’ll know it worked when the bolt heads are fully visible and accessible for your Phillips screwdriver.
The common mistake at this step is forcing a flathead screwdriver under the wrong part of the hinge, permanently scratching the porcelain surface. Always pry against the plastic bracket, never against the toilet bowl itself.
Step 2: Extract the Old Blind Hole Anchors
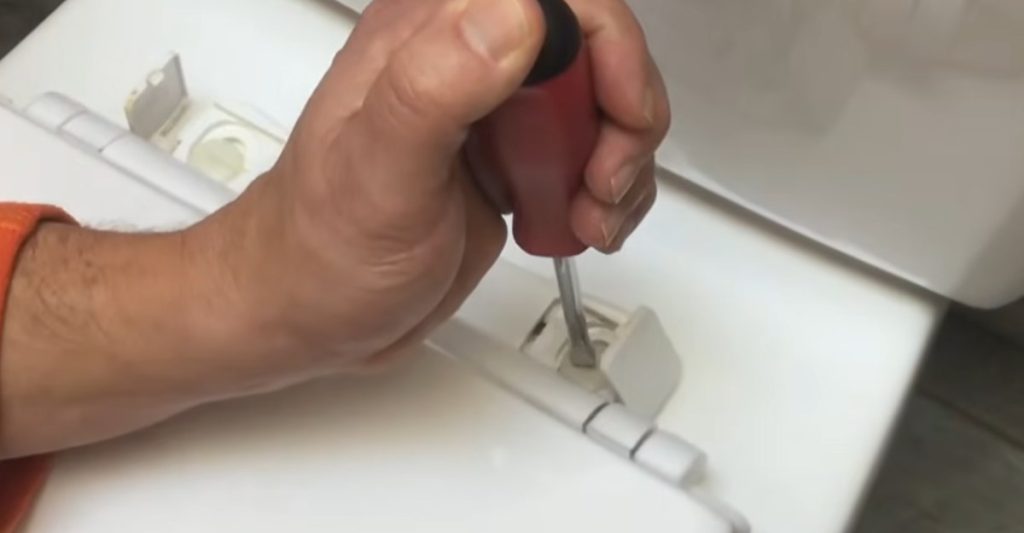
Unscrew the existing bolts completely using your manual Phillips screwdriver and pull the old rubber anchors straight up and out of the holes. Turn the screwdriver counter-clockwise while applying slight upward pressure. The upward pressure stops the rubber anchor from simply spinning uselessly inside the hole. Once the bolt is out, lift the metal or plastic hinge plate away.
Grab the exposed lip of the rubber anchor with your needle-nose pliers. Wiggle it back and forth while pulling upward. Old rubber swells and hardens over time. If the anchor refuses to budge, thread the bolt back in halfway, grab the bolt head with your pliers, and use it as a handle to yank the whole assembly upward.
You’ll know it worked when you have two completely empty mounting holes exposing the hollow interior of the toilet bowl.
The common mistake at this step is pushing downward too hard while unscrewing. This can detach the internal brass nut from the rubber sleeve, causing the bolt to spin infinitely without ever coming loose.
Step 3: Clean and Degrease the Porcelain Mounting Area
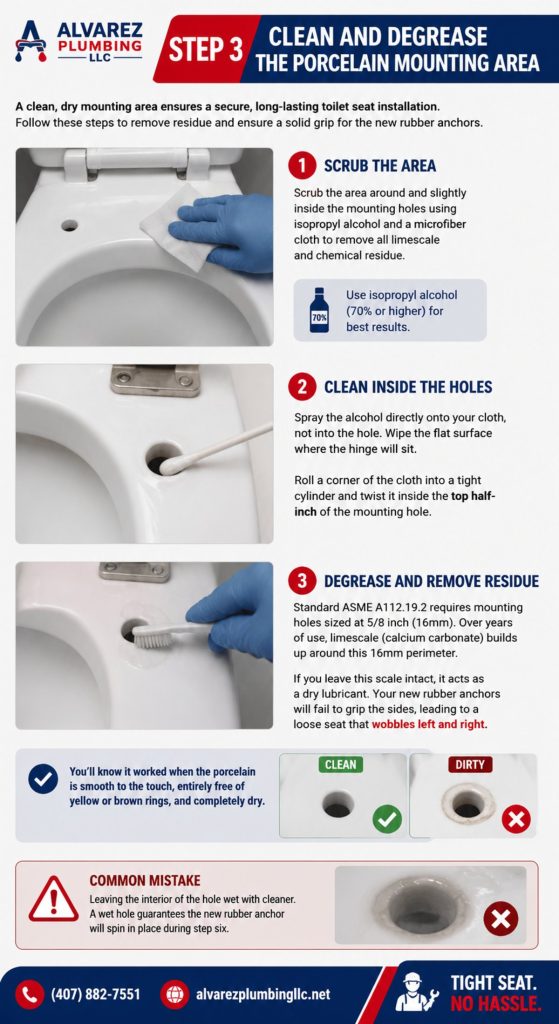
Scrub the area around and slightly inside the mounting holes using isopropyl alcohol and a microfiber cloth to remove all limescale and chemical residue. Spray the alcohol directly onto your cloth, not into the hole. Wipe the flat surface where the hinge will sit. Roll a corner of the cloth into a tight cylinder and twist it inside the top half-inch of the mounting hole.
Standard ASME A112.19.2 vitreous china plumbing fixtures feature mounting holes strictly sized at 5/8 inch (15mm). Over years of use, urine scale (calcium carbonate) builds up around this 15mm perimeter. If you leave this scale intact, it acts as a dry lubricant. Your new rubber anchors will fail to grip the sides, leading to a seat that wanders left and right.
You’ll know it worked when the porcelain is smooth to the touch, entirely free of yellow or brown rings, and completely dry.
The common mistake at this step is leaving the interior of the hole wet with cleaner. A wet hole guarantees the new rubber anchor will spin in place during step six.
Step 4: Insert the New Expanding Anchors
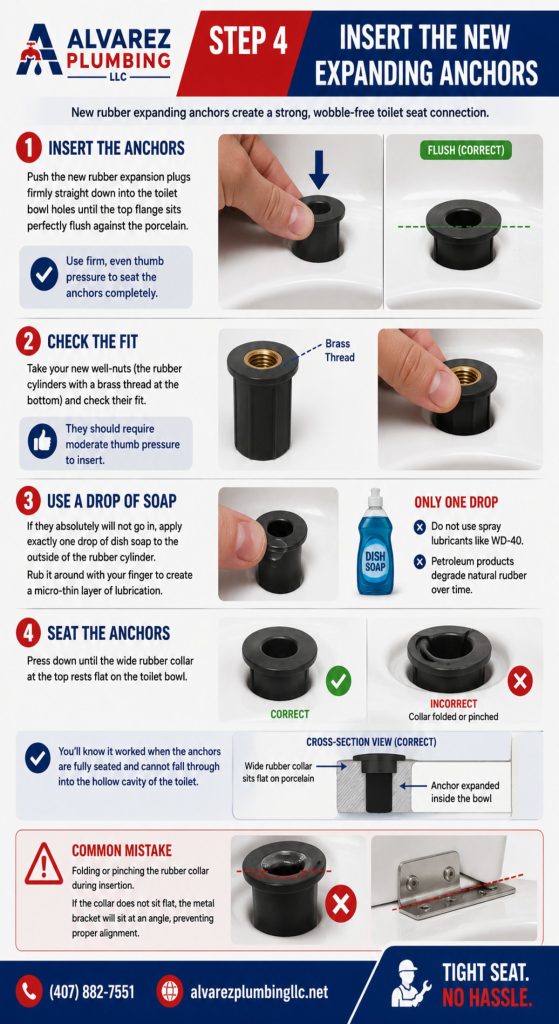
Push the new rubber expansion plugs firmly straight down into the toilet bowl holes until the top flange sits perfectly flush against the porcelain. Take your new well-nuts (the rubber cylinders with a brass thread at the bottom) and check their fit. They should require moderate thumb pressure to insert.
If they absolutely will not go in, apply exactly one drop of dish soap to the outside of the rubber cylinder. Rub it around with your finger to create a micro-thin layer of lubrication. Do not use spray lubricants like WD-40. Petroleum products degrade natural rubber over time, ensuring your seat will come loose again in six months. Press down until the wide rubber collar at the top rests flat on the toilet bowl.
You’ll know it worked when the anchors are fully seated and cannot fall through into the hollow cavity of the toilet.
The common mistake at this step is folding or pinching the rubber collar during insertion. If the collar does not sit flat, the metal bracket will sit at an angle, preventing proper alignment.
Step 5: Align the Hinges and the Seat Overhang
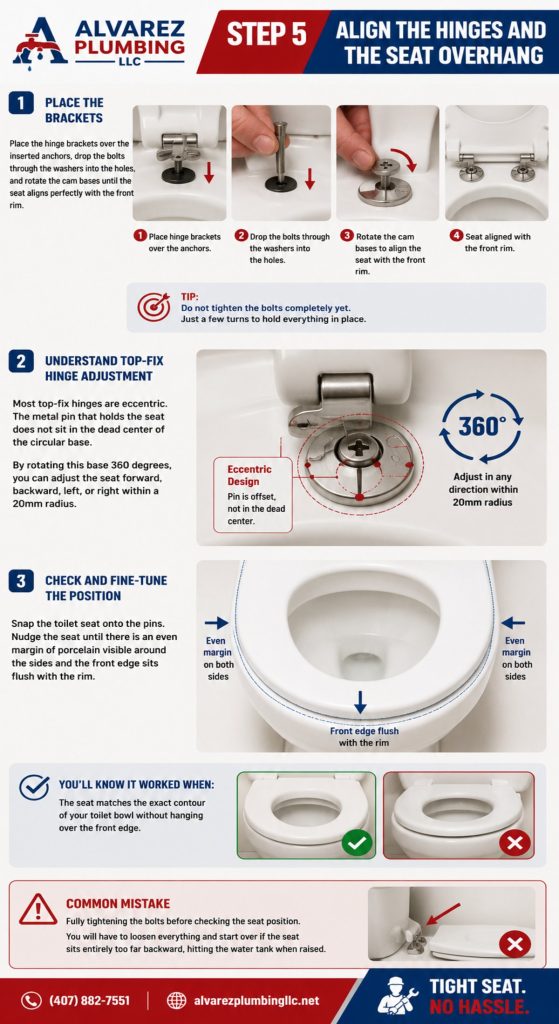
Place the hinge brackets over the inserted anchors, drop the bolts through the washers into the holes, and rotate the cam bases until the seat aligns perfectly with the front rim. This is the most technically precise step. Do not tighten the bolts completely yet. Turn them clockwise by hand just three or four rotations to catch the internal brass threads.
Most top-fix hinges are eccentric. The metal pin that holds the seat does not sit in the dead center of the circular base. By rotating this base 360 degrees, you can adjust the seat forward, backward, left, or right within a 20mm radius. Snap the toilet seat onto the pins. Nudge the seat until there is an even margin of porcelain visible around the sides and the front edge sits flush with the rim.
You’ll know it worked when the seat matches the exact contour of your toilet bowl without hanging over the front edge.
The common mistake at this step is fully tightening the bolts before checking the seat position. You will have to loosen everything and start over if the seat sits entirely too far backward, hitting the water tank when raised.
Step 6: Perform the Final Manual Tightening
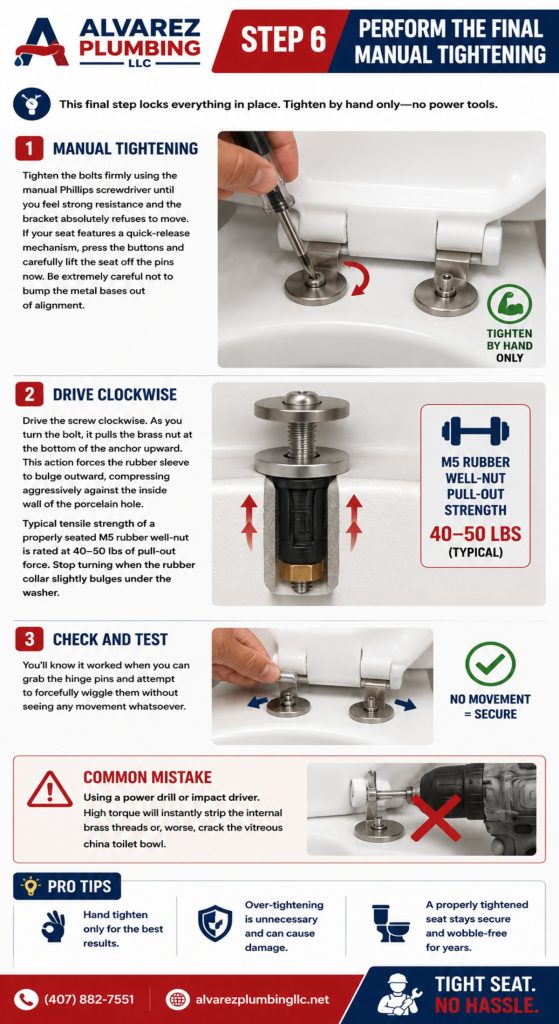
Tighten the bolts firmly using the manual Phillips screwdriver until you feel strong, mechanical resistance and the bracket absolutely refuses to move. If your seat features a quick-release mechanism, press the buttons and carefully lift the seat off the pins now. Be extremely careful not to bump the metal bases out of alignment.
Drive the screw clockwise. As you turn the bolt, it pulls the brass nut at the bottom of the anchor upward. This action forces the rubber sleeve to bulge outward, compressing aggressively against the inside of the porcelain hole. Typical tensile strength of a properly seated M6 rubber well-nut is rated at 40-50 lbs of pull-out force. Stop turning when the rubber collar slightly bulges under the washer and the screwdriver requires serious wrist effort to turn. Snap the decorative covers back down.
You’ll know it worked when you can grab the hinge pins and attempt to forcefully wiggle them without seeing any movement whatsoever.
The common mistake at this step is using a power drill or impact driver. High torque will instantly strip the internal brass threads or, worse, crack the vitreous china toilet bowl.
Common Mistakes and How to Fix Them
Even practitioners occasionally encounter hardware failures. Knowing how to recover from these mechanical setbacks separates a successful installation from a frustrating afternoon.
The Bolt Spins Infinitely and Will Not Tighten
- Cause: The internal brass threaded insert inside the rubber anchor has broken free from its rubber housing. The entire insert is spinning alongside the bolt.
- Fix: You must apply opposing force. Slide a flathead screwdriver under the head of the bolt. Pry upward firmly while turning the Phillips screwdriver counter-clockwise. This upward tension wedges the brass nut against the rubber, allowing the bolt to back out. Discard the damaged anchor immediately and use a replacement.
The Entire Rubber Anchor Spins Inside the Porcelain
- Cause: The 15mm mounting hole is either slightly oversized from the factory, or you left the hole wet with soapy water or alcohol.
- Fix: Remove the anchor entirely. Wipe the inside of the porcelain hole until it is completely bone dry. Wrap a single, tight layer of standard electrical tape around the barrel of the rubber anchor. This slightly increases its outer diameter, providing the necessary friction to grip the smooth porcelain walls.
The Seat Still Wobbles After Full Tightening
- Cause: The bolts are technically tight, but the hard plastic or metal brackets are skidding across the slick glazed porcelain surface under the weight of a user.
- Fix: Loosen the bolts slightly. Lift the hinge bracket. Place a thin rubber washer, or apply a very fine bead of clear silicone caulk, directly underneath the flat base of the hinge bracket. Retighten the assembly and let the silicone cure for two hours. The rubber or silicone acts as a high-friction gasket.
The Rubber Anchor Falls Into the Toilet Cavity
- Cause: Pushing too hard with the screwdriver before the bolt threads engage, forcing the anchor past its collar.
- Fix: If the anchor falls into the hollow space of a skirted toilet, it is generally lost forever. It will not affect the flushing mechanism, as the cavity is separate from the water trap. You simply must use a new anchor. This is why buying a kit with spare fittings is highly recommended.
Hardware Variations and Adjustments
Hardware manufacturers utilize different technologies depending on the price point of the seat. The installation methodology shifts slightly based on which variation you purchase.
Rubber Well-Nuts vs Plastic Toggle Anchors
Most premium kits rely on rubber well-nuts. These expand outward, providing excellent vibration dampening and a high-friction grip. Cheaper kits often supply plastic toggle anchors. Plastic anchors feature a split bottom that flares open like an umbrella beneath the porcelain hole. Plastic toggles require you to push them entirely through the hole until you hear a distinct click. They do not rely on friction against the hole walls. Instead, they rely on physical clamping force against the underside of the porcelain lip. Plastic toggles are harder to remove later if they become brittle and snap.
Quick-Release Button Hinges vs Fixed Pin Hinges
Modern sanitary standards heavily favor quick-release hinges. These allow the user to remove the entire seat assembly for deep cleaning. When installing quick-release hinges, you must ensure the two metal mounting pins are perfectly parallel to each other. If one pin is rotated slightly inward, the seat will bind and the quick-release buttons will jam. Fixed pin hinges are permanently attached to the seat. You must tighten the bolts with the seat attached, requiring you to carefully navigate your screwdriver past the raised lid.
Top-Fixing vs Dual-Fixing Hardware
Some universal seats come with dual-fixing hardware. This means the kit includes both expanding top-fix anchors and standard plastic bottom-mount nuts. If your toilet is skirted and you have no access underneath, you will discard the standard plastic nuts entirely. Attempting to force a bottom-mount plastic nut into a top-mount hole will damage the threads and ruin the hardware.
Time and Cost Breakdown
Replacing a seat using this exact method is a highly economical DIY task. The components are cheap, and the labor requires no specialized trade skills.
| Approach | Labor Time | Hardware Cost | Labor Cost | Total Estimated Cost |
| DIY Installation | 15–20 minutes | $12 – $25 | $0 | $12 – $25 |
| Professional Plumber | 10 minutes | $15 – $30 | $90 – $150 | $105 – $180 |
The primary variable in the DIY timeframe is the extraction of the old hardware. If your old bolts are heavily rusted or the rubber is fused to the ceramic, extraction can consume 15 minutes on its own. The actual installation of the new hardware rarely exceeds five minutes. If you strip a bolt head, you may need to drill it out using a titanium drill bit, which increases both the time and the required tool cost significantly.
Frequently Asked Questions
How do I know if I need a top fixing toilet seat?
Run your hand under the rim of the bowl at the back where the hinges sit. If you feel smooth porcelain going all the way to the floor and cannot locate a threaded bolt or a plastic nut, you have a fully skirted toilet. This necessitates a top-fixing blind hole kit.
Can I convert a bottom fix toilet to a top fix?
Yes. If you are tired of crawling on the floor to tighten loose plastic nuts, you can discard your standard bottom-fix hardware. Purchase a top-fix expansion kit and insert the rubber anchors directly into the standard 5/8 inch mounting holes from above.
Are all top fix toilet seat hinges a standard size?
The 15mm (5/8 inch) porcelain holes in the bowl are standardized across the plumbing industry. However, the metal pins that insert into the seat itself vary by manufacturer. You cannot usually mix a Kohler seat with a Toto hinge bracket.
Why does my top fix toilet seat keep coming loose?
The rubber anchors slowly compress and lose elasticity over time due to weight and temperature changes. Furthermore, cleaning chemicals seep under the hinges and degrade the rubber. Replacing the expanding anchors every three to five years is considered standard maintenance.
Can I reuse the old rubber anchors?
No. Once a rubber well-nut has been fully compressed for several months, it takes a permanent set. It will never return to its original diameter. Reusing old anchors guarantees a wobbly seat within a few weeks of reinstallation.
Final Thoughts on Achieving a Secure Fit
Learning how to tighten toilet seat with no access underside stops a daily annoyance using nothing more than a screwdriver and ten dollars of replacement hardware. The secret to a permanent fix lies entirely in the preparation. Thoroughly extracting the old residue, maintaining bone-dry porcelain holes, and properly aligning the eccentric cams before applying final torque will ensure your seat remains perfectly rigid for years. Take your time during the alignment phase, avoid the temptation to use power tools, and always rely on the mechanical expansion of the fresh rubber well-nuts to do the heavy lifting.